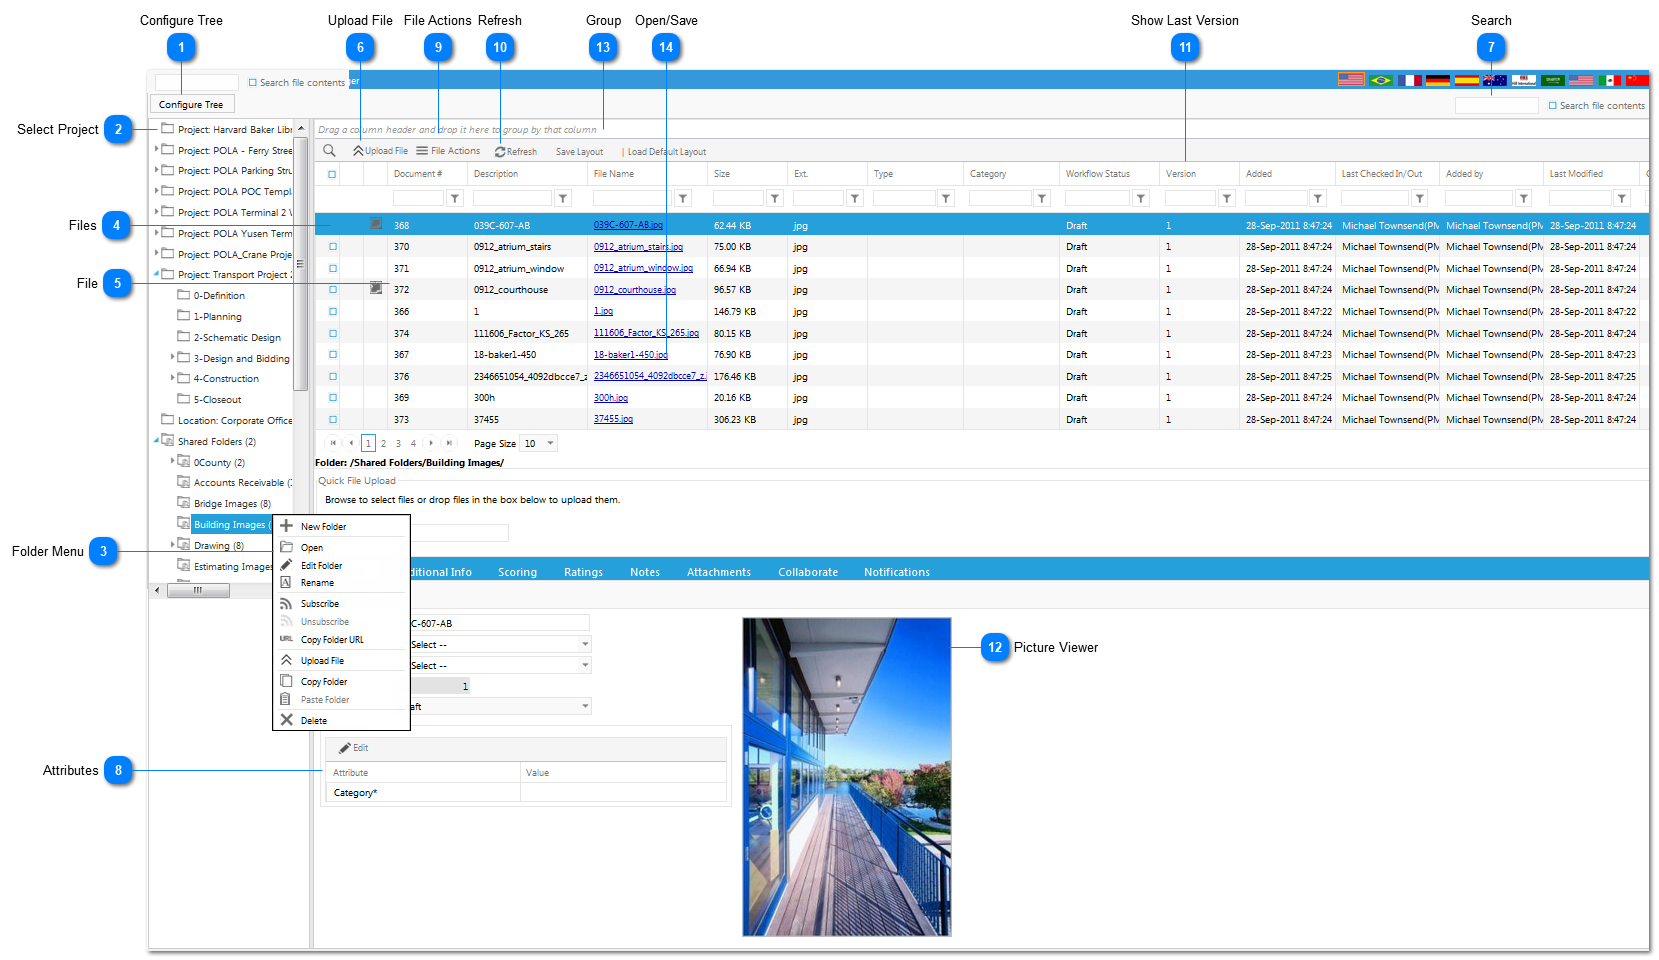
The Document Manager module is used to store project related documentation (pictures, drawings, schedules etc.).
Navigation Path: Toolbox>Document Manager
 Configure TreeClick the configure tree button to filter the projects shown to those you wish to see. When selections are complete, click the Save Tree button.
|
 Select ProjectUse to select the project documents you want to view. Once selected the project(s) selected will appear at the top of the folder structure.
|
 Folder MenuRight click on the folder name and a menu will be displayed:
-
Open: Click to open folder and sub folders
-
Edit: Click the edit option to modify to:
-
-
Modify the type or Category -
-
-
-
Rename: Click to change the name of the folder
-
Subscribe: Click to setup a subscription to the folder to be notified when documents/revisions are added, checked in or out, downloaded, etc.
-
Unsubscribe: Click to cancel an existing subscription.
-
Copy Folder URL: Click to copy the file folder URL.
-
Upload File: Click to upload a file.
-
Copy Folder: Click to copy a folder and/or contents.
-
Paste Folder: Click to paste a folder that was copied.
-
Delete: Click to delete a folder or file.
-
Permissions: Click to view or set permissions for a folder or file.
Note: All folders are controlled by permissions set up by your Administrator. All users may not have all options available.
|
 FilesDisplays all information regarding the files that have been uploaded including: file name, size of file, type of file (jpeg, word etc.), the date the file was uploaded, the name of the person who uploaded the file and the date the file was checked out and by who.
|
 FileClick to select a file. Once selected a menu will be displayed that will allow you to check out/in the document and open the PM Web viewer (see PM Web Viewer section) which allows you to mark up a document.
The green arrow to the left of the file name indicates that file is checked out by another user.
|
 Upload FileClick to upload a file to the document manager. Be sure that the folder you want to upload to is highlighted. You can also use the folder menu (see #2) to upload a file.
If you are uploaded a modified version of an existing document, be sure the name is exactly the same as the existing document or the system will not recognize the file as a new version.
|
 SearchUse to search for existing documents. Click the "search file contents" checkbox if you want to search for key words in the document itself.
|
 AttributesUse to set up document "tags". This will require that any document uploaded for a particular folder will need to be tagged with additional information. Example: Meeting Minutes folder would be set up with meeting type drop down lists. To add attributes, edit the folder (see Folder Menu).
|
 File ActionsUse to set up folder permissions based on role or user.
|
 RefreshClick to refresh the data displayed on the screen.
|
 Show Last VersionDisplays the file version of the document.
|
 Picture ViewerOnce a file is selected, the document will be displayed.
|
 GroupUse to group files. To group, drag a column header and drop it in this area. Your view will now be grouped by the selected item. To ungroup, drag it back to the grid.
|
 Open/SaveClick on the file name to either open or save the selected file.
|
The online help was made with Dr.Explain
|