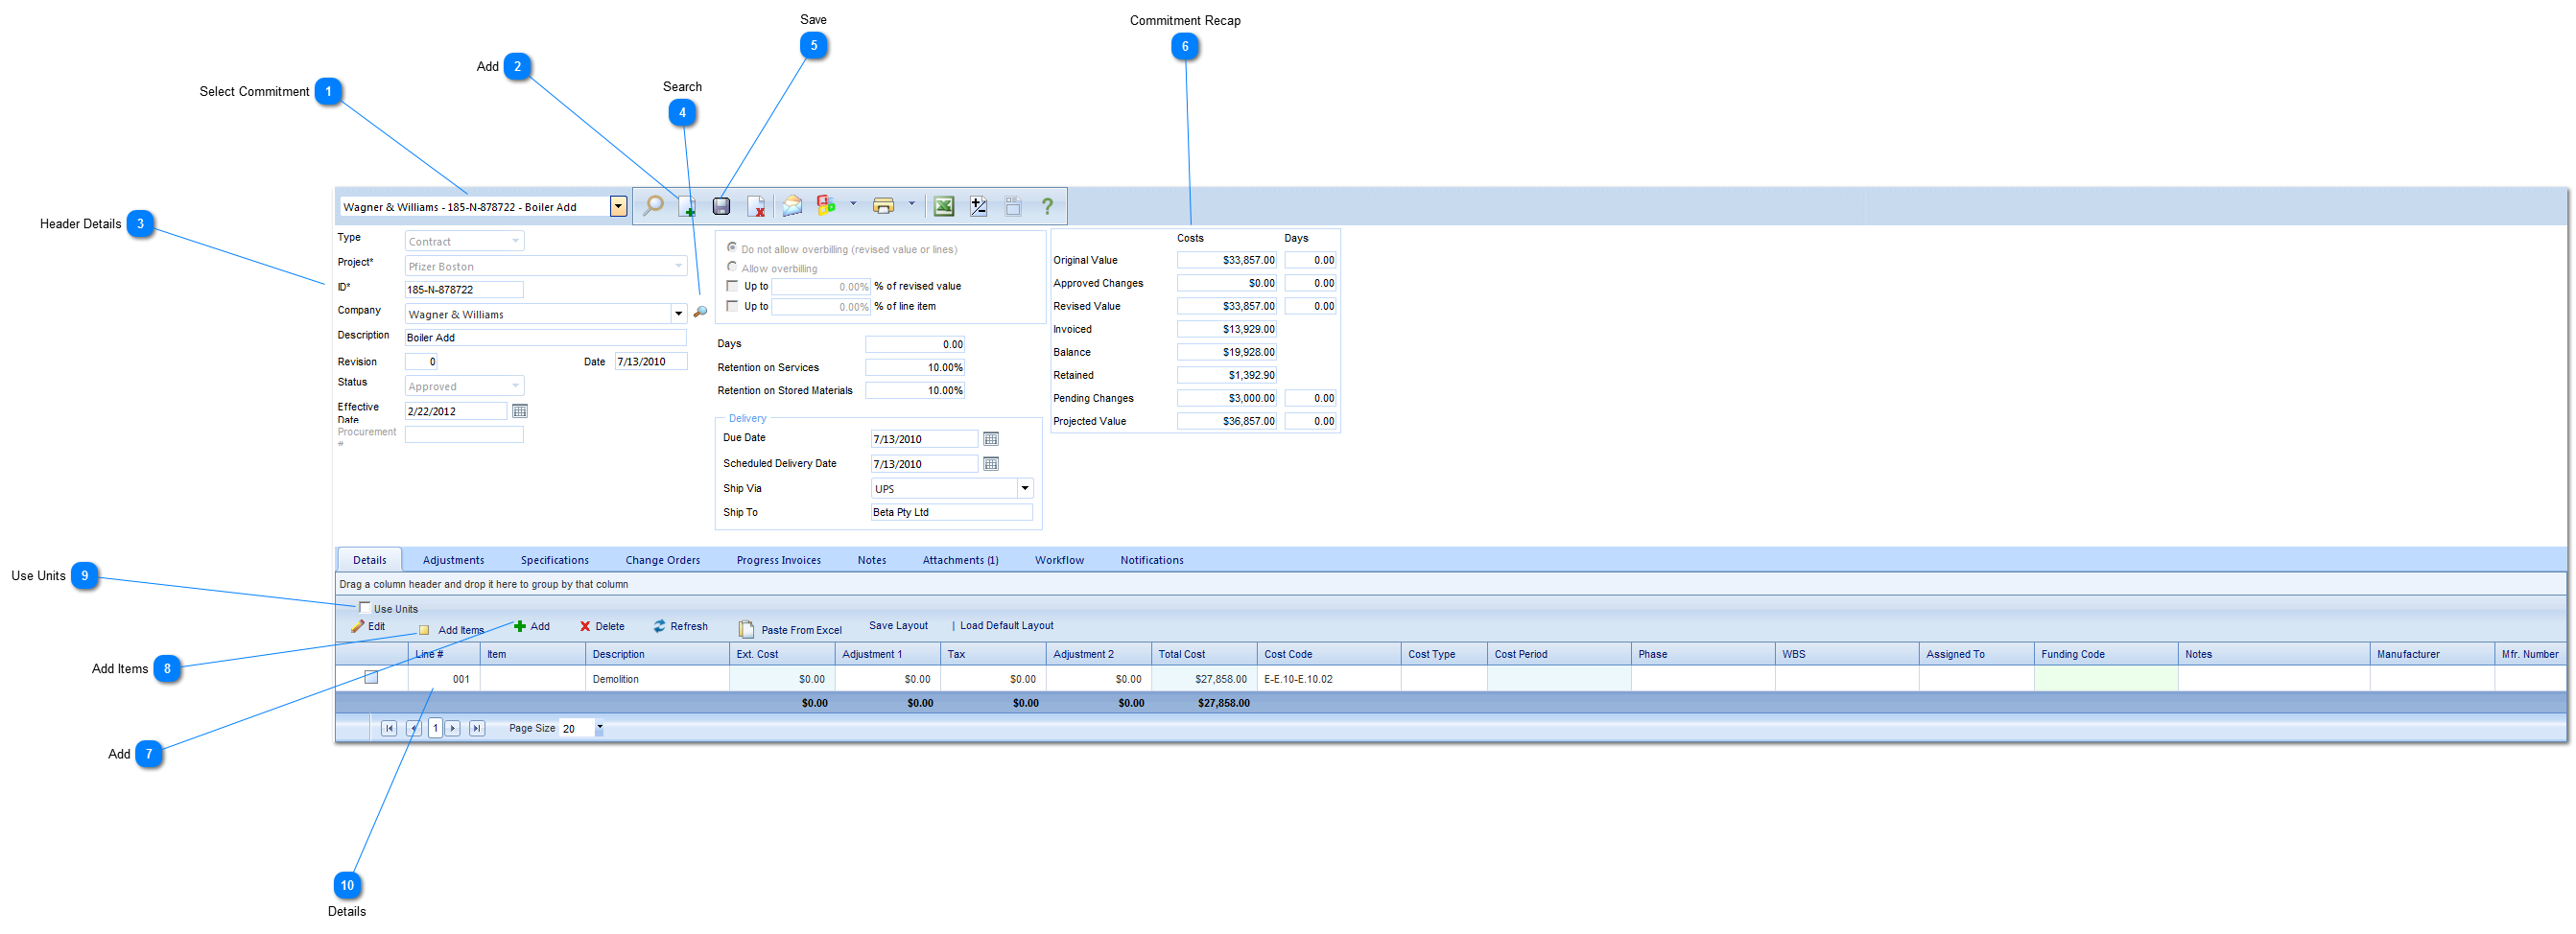
Commitment

A Commitment is used to track Subcontracts, Purchase Orders, etc. that will commit costs against the Budget.
 
Navigation Path:  Cost Management > Contracts > Commitments
 
Commitment
1

Select Commitment

Use to search for existing commitments.
2

Add

Click to add a new commitment.
3

Header Details

Type:  Select the type (contract, PO etc.) of commitment.
Project:  Used to select the project associated with the commitment.
ID:  This field is automatically populated by PMWeb but can be modified with your commitment number.
Company:  Select the company or vendor the contract is associated with.
Description:  Enter a general description (a more detailed description should be entered in the details section of this form).
Revision:  Enter the revision number.
Date:  This field will automatically be populated by PMWeb with the current date.
Status:  The status (draft, submitted etc.) will automatically be updated by PMWeb based on the workflow configuration.
Effective Date:  Enter the date of the contract.
Procurement #:  This field is automatically populated by PMWeb if this Commitment was generated from a Procurement in the Planning module.
Overbilling:  Select whether the contract will allow invoices to exceed the total contract value.  If Allow Overbilling is selected, check the box and enter the percentage of overage allowed, either by the line item in the contract or total contract value.
Days: Enter the number of days the Commitment is valid for.   By entering the number of days on the Commitment you will then be able to create change orders that affect the number of days of the Commitment.
Retention on Services:  Enter the percentage of retention on services.
Retention on Stored Materials:  Enter the percentage of retention on stored materials.
Delivery:  Enter the Due Date of delivery, the scheduled delivery date, how the item should be shipped (UPS, Fed Ex etc.) and where the item should be shipped to.  The Shipped To field can be manually populated or you click on the field to open a list of company or project addresses.
4

Search

Click to search the contact database.
5

Save

Click to save the header details of the form.
6

Commitment Recap

These fields provide an overview of the commitment.  This area will be populated after you save the header details and add line items to the commitment.
7

Add

Click to add items to the commitment.
8

Add Items

  Click Add Items to drag and drop items that have been pre-configured by your Administrator in in Portfolio>Lists>Items menu.  Use the Add button to manually enter new items.
9

Use Units

This field will allow you to enter units of measure and quantities of that item.  If this option is not selected, the line item will be a lump sum value.
10

Details

Item:  This field will be automatically populated by PMWeb.
Description:  This field will be automatically populated by PMWeb based on the cost code selected.
UOM:  Select the unit of measure from the list values (only viewable if use unit cost is checked)
Quantity:  Enter the quantity (only viewable if use unit cost is checked)
Unit Cost: Enter the cost of the line item (only viewable if use unit is checked)
Ext Cost:  If use units is checked, this field will automatically calculate the quantity x the unit cost.
Total Cost: PMWeb will automatically populate this field.
Adjustments:  Manually enter Adjustment Group 1 values or you can allow PMWeb to automatically calculate the Adjustment based on the information entered on the Adjustments tab.
Tax: Manually enter the Tax value or you can allow PMWeb to automatically calculate the Tax based on the information entered on the Adjustments tab.
Cost Type: Select the cost type (equip., labor etc.) associated with the line item. 
Cost Code:  Select the Cost Code associated with the line item.
Funding Code: Click the icon under the Funding field to set funding percentages or amounts for that line item.  The current funding sources will be displayed.  Enter either the percentage or cost for each funding source and click save (PMWeb will automatically update either the percentage or the amount fields based on your entry).  The funding field will now be populated with an amount based on values entered in the funding screen.
Company:  Select the company associated with the line item if applicable.
Task: Select the task associated with the line item.  The options available are based on the tasks established in the schedule module.
Period:  Select the budget/accounting period of the line item.  The options available are configured by your Administrator in the Portfolio>Lists>Periods menu.
Notes: Enter details regarding the line item
Phase: Select the phase (design, construction etc.) associated with the line item.  The options are configured by your Administrator in the Porfolio>Lists>Projects menu.
WBS: Select the work breakdown structure associated with the line item.  The options are configured by your Administrator in the Portfolio>Lists>Projects form on the Locations tab.
Manufacturer: Select the manufacturer associated with the line item.
Manufacturer #:  Enter the manufacturer's number associated with the line item. 
Location: Select the location (building 1, 2 etc.) associated with the line item.  The options are configured by your Administrator in the Porfolio>Lists>Projects menu.
 
Once all information is entered, click Save.
 
Note:  To hide the fields that are not in use by your organization, right click on any header.  Go to columns and uncheck the fields you want to hide then click Save Layout.