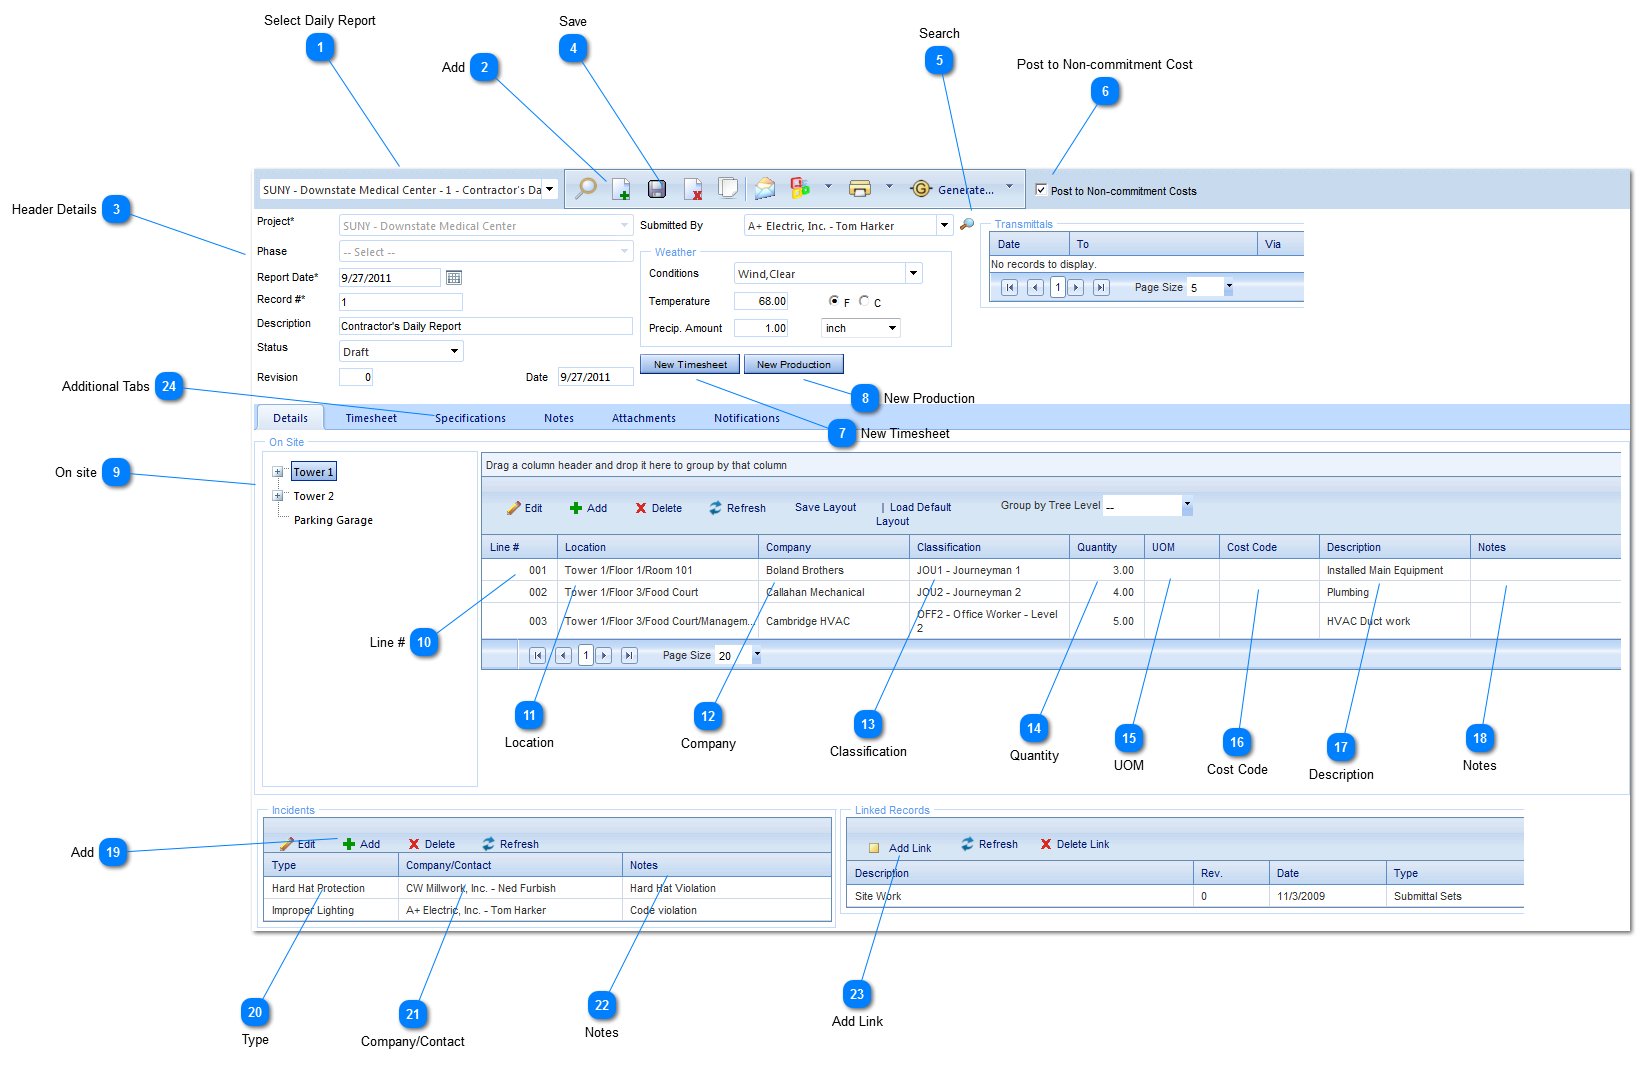
The Daily Report form is used by the contractor or sub contractor to provide the owner with important details such as safety incidents, weather conditions and resources on site.
Navigation Path: Engineering Forms > Advanced Forms > Daily Reports
 Select Daily ReportUsed to search existing Daily Reports.
|
 AddClick to start a new form.
|
 Header DetailsProject: Used to select the project associated with the Daily Report.
Phase: Select the phase (construction, design, etc.) that the project is currently in. The options for this field are configured by your Administrator in the Portfolio>Lists>Projects menu.
Report Date: This field will automatically be populated by PM with today's date.
Record #: The form number will automatically be populated by PMWeb with the next available numerical value depending on the type of form and project it relates to.
Description: Enter a general description (a more detailed description should be entered in the details section of this form).
Status: The status (draft, submitted etc.) will automatically be updated by PMWeb based on the workflow configuration.
Revision: Enter the revision number for this record.
Date: The revision date will automatically be populated by PMWeb using the current date.
Submitted By: Select the company and name of the person who is submitting the form. The available contacts are set up in Portfolio>Lists>Companies.
Conditions: Select the conditions (windy, rainy etc.) at the time the report was taken. The available options are configured by the Administrator in the Portfolio>Lists>Lists menu.
Temperature: Enter the temperature at the time the report was taken, click on F for farenheit or C for Celcius.
Precip. Amount: Enter the precipitation amount and unit of measure (1, 2 inch etc.) at the time the report was taken.
|
 SaveClick to save the Daily Report header information. Once saved you will be able to add more information in the details section of the form.
|
 SearchUse the search capability to locate a user from your contact database.
|
 Post to Non-commitment CostClick if the cost is not associated with a current commitment.
|
 New TimesheetClick to add a new timesheet that is associated with this report. Once clicked, you will be guided to the timesheet form. See the toolbox section of this guide for instructions.
|
 New ProductionClick to enter new production information associated with the report. Once clicked, you will be guided to the new production form.
|
 On site To add options, right click and enter on site information (building, towers etc). Once entered, drag and drop the information to the right hand side of the screen. Note: the information contained in this list is shared with the Punch List options.
|
 Line #This field will be automatically populated by PMWeb.
|
 LocationEnter (or use the drag and drop) the location manually.
|
 CompanySelect the company name. The available companies are set up in Portfolio>Lists>Companies.
|
 ClassificationEnter the type of workers (journeyman, apprentice etc.) that were on site. The available options are configured by the Administrator in the Portfolio>Lists>Lists menu.
|
 QuantityEnter the number of resources from each classification that were on site when report was taken.
|
 UOMEnter the unit of measure (resources, inches etc.) where applicable.
|
 Cost CodeEnter the applicable cost code.
|
 DescriptionEnter a description (work performed, etc.) for the line item.
|
 NotesEnter additional details for that line item.
|
 AddClick to add incidents that occured on site.
|
 TypeSelect the type (code violation, hard hat etc.) of incident that occured on site.
|
 Company/ContactSelect the person and company involved with the incident. The available companies and contacts are set up in Portfolio>Lists>Companies.
|
 NotesEnter additional details regarding the incident. Once all information is entered, click Save.
|
 Add LinkClick to associate other forms with this report. Once selected, a list of existing forms for that project will be displayed. Select the forms to link by dragging the form from the left hand side of the screen and dropping them on the right hand side of the screen. Once all forms are selected, click save and close.
|
 Additional TabsFor more information on the other tabs please see the Overview/Navigation section.
|
|