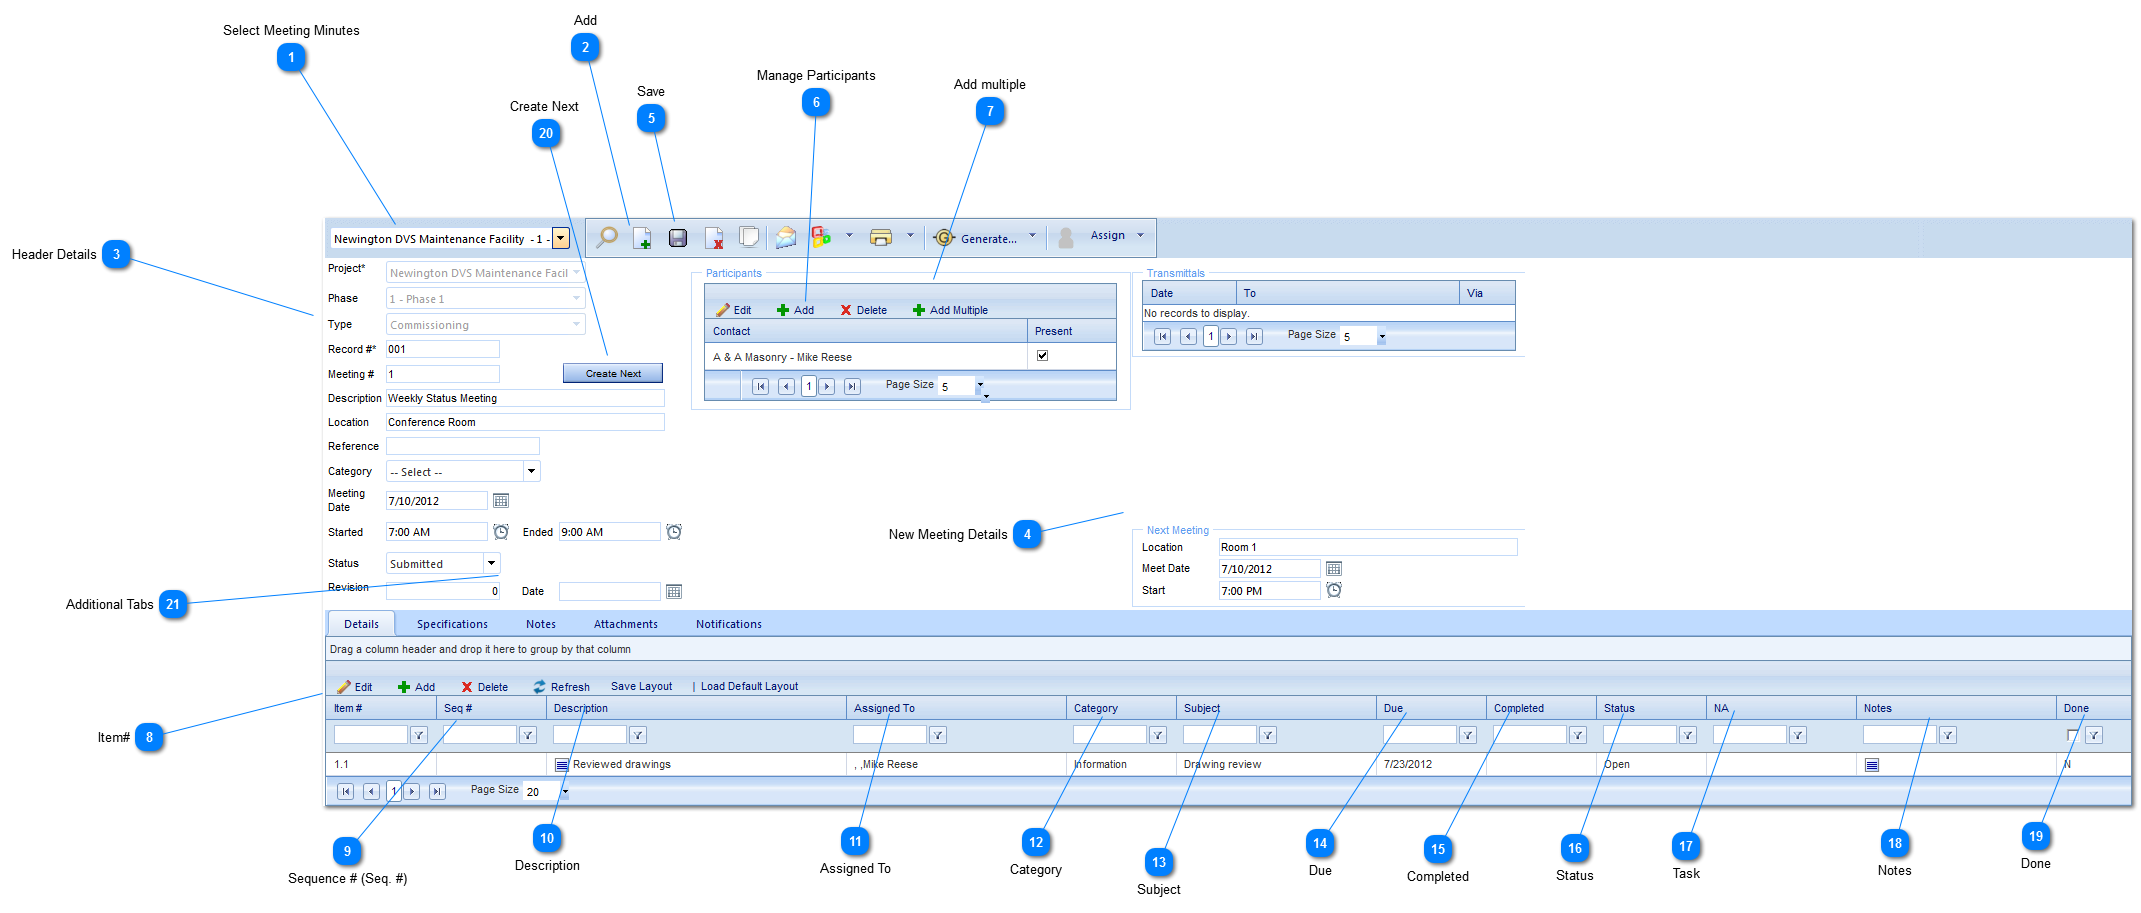
Meeting Minutes

The Meeting Minute form is used to document and track Meeting Minutes as well as track Action Items associated with the meeting.
 
Navigation Path:  Engineering Forms > Advanced Forms > Meeting Minutes
 
Meeting Minutes
1

Select Meeting Minutes

Use to search for existing Meeting Minutes.
2

Add

Click to start a new form.
3

Header Details

Project:  Used to select the project associated with the Meeting Minutes.
Phase:  Select the phase (construction, design, etc.) that the project is currently in.  The options for this field are configured by your Administrator in the Portfolio>Lists>Projects menu.
Type:  Select the meeting type (design, safety etc.).  The options for this field are configured by your Administrator in the Portfolio>Lists>Lists menu.
Record #:  Enter the record number for the first meeting only. PMWeb will automatically populate based on the next numerical value.
Meeting #:  The meeting number will automatically be populated by PMWeb with the next available numerical value depending on the type of meeting and project it relates to.
Description:  Enter a general description (a more detailed description should be entered in the details section of this form).
Location:  Enter where the meeting is to take place (building, address etc.).
Meeting Date:  Enter the date of the meeting.
Started: Enter the time the meeting started.
Ended: Enter the time the meeting was completed.
Status:  The status (draft, submitted etc.) will automatically be updated by PMWeb based on the workflow configuration.
Revision:  Enter the revision number for this record.
Date:  Enter the revision date.
4

New Meeting Details

Location:  Enter where the next meeting is to take place (building, address etc.).
Meet Date:  Enter the date the next meeting is scheduled for.
Start: Enter the time the next meeting is scheduled for.
5

Save

Click save after entering all of the header data.  Once the header data is saved you will be able to add line items and participants.
6

Manage Participants

Add: Click to add attendees.  Use the drop down list to select a contact. 
Edit: Click to edit the existing attendee list.  Place a check mark to the right of the attendee to note they were present at the meeting.
Delete:  Click to delete an attendee.
7

Add multiple

While within the meeting minutes record, click Add Multiple to add more than one particpant or add a distribution list.
8

Item#

This field will automatically be populated by PMWeb after saving the line.  It will number based on the meeting number and line number.
9

Sequence # (Seq. #)

Enter the sequence number of the line item.  Once the first item is populated, PMWeb will automatically populate this field with the next numerical value.
10

Description

Press the button to enter the description of the line item.
11

Assigned To

Select the person you want to assign an action to.
12

Category

Select the category the line item is related to.  The categories are configured by your Administrator in the Portfolio>Lists>Lists menu.
13

Subject

Enter the subject of the line item.
14

Due

Select the date the assignment is due.
15

Completed

Enter the date the item was completed.
16

Status

Select the status (complete, submitted etc.) of the assignment.
17

Task

Select the task related to the assignment (this is pulled in from the scheduling module).
18

Notes

Press the button to enter any additional information associated with the line item.
19

Done

Click on this box to note that the line item is complete.  Once all information has been entered, click the Save button.
20

Create Next

 Click this button to create a new meeting.  The information from the last meeting will automatically be populated in the new meeting including items that are not checked as Done from the previous meeting.  This button is only available in the last meeting of each meeting type per project.
21

Additional Tabs

For more information on the other tabs please see the Overview/Navigation section.