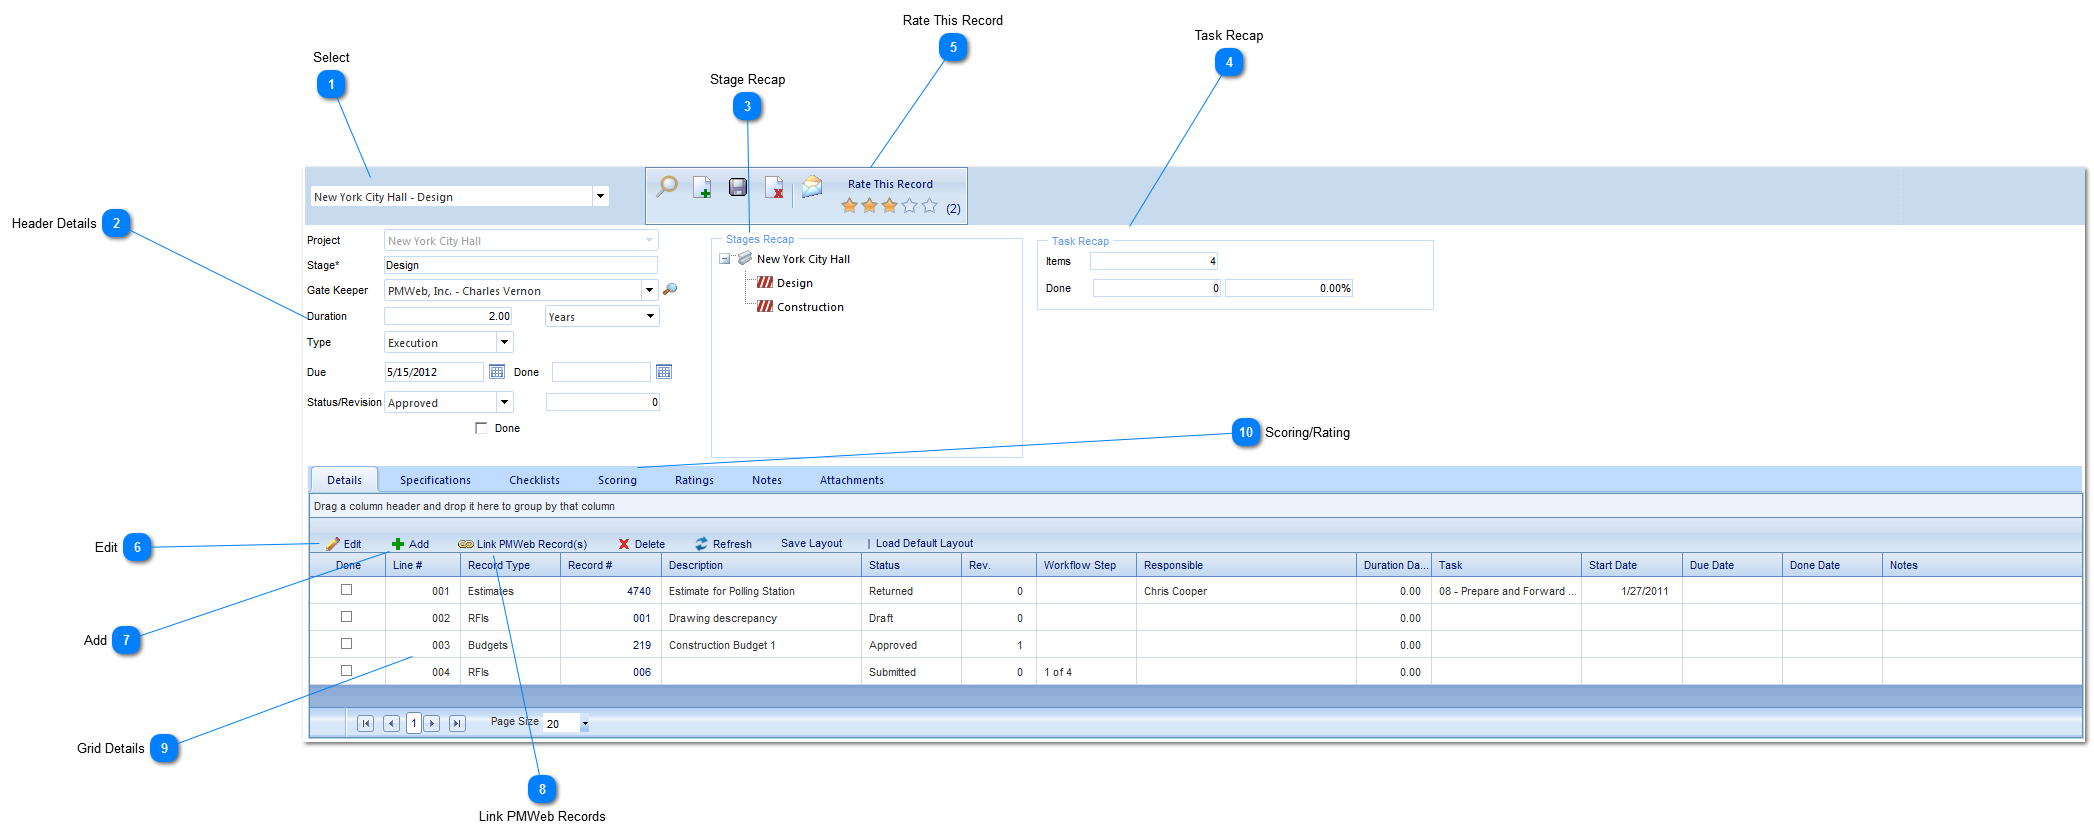
Stage Gates


The overriding goal of Stage Gate Management is to commit fewer resources to the early stages of the process and to examine the results of each stage to determine whether or not the project should proceed or be stopped.  The Stage Gate process is made up of stages and gates:
 
  • Stages are comprised of any number of activities which shape and define the project.  Stage activities can occur in sequence and/or parallel, with the goal of creating predefined deliverables.
 
Gates are evaluation points where the decision is made to continue the project or end it, based on the evaluattion of the stage deliverables and other criteria.
 
Navigation Path:  Toolbox>Stage Gates
 
Stage Gates
1

Select

Select the project.
2

Header Details

Project:  Click to select the project.              
Stage:  Enter the project name.
Gate Keeper:  Select the company/person who is responsible for overseeing the stage gates.  Utilize the magnifying glass to search for contacts.
Duration: Enter the duration then select days, months, years, quarters.
Type: Select the type.  The options are configured in Portfolio>Lists.
Due:  Select the due date.         
Done:  Select the date the stage was complete.
Status/Revision: Select the status of the stage gate.  The revision number will be automatically populated by PMWeb.
Done: Click to note that the stage gate is complete.
 
3

Stage Recap

This section allows you to view the current status/progress of gates or activities.  To view, click on the stage name and the information relating to that stage will be displayed in the details grid.
4

Task Recap

This section displays information relating to the number of items that relate to the stage gate as well as the progress (done and percentage complete).
5

Rate This Record

This area displays the how this gate has been rated by users in the ratings tab.  The number denotes how many users have rated this record.
6

Edit

Click to edit an existing line item.  To edit, highlight the line item and click Edit.
7

Add

Click to add a line item.
8

Link PMWeb Records

Click to link existing records (cost items, engineering forms etc.).  Once clicked a list of records will be displayed.  Select the records you wish to attach by clicking on the record name and drag the items to the right hand side of the screen.  Once all items are selected, click Save.
9

Grid Details

Done:  Click the box to note that the item is complete.
Line #:  This field will be automatically populated by PMWeb.
Record Type:  Select the record type (commitments, invoices, RFI's etc.)
Record #:  This field will be automatically populated by PMWeb.
Description:  Enter a description of the line item.
Status: Select the status (approved, rejected etc.) of the line item
Revision:  This field will automatically be populated by PMWeb.
Workflow Step:  If you add a link, this field will automatically be populated with the step the workflow is currently in.
Responsible: Select the person responsible for completing the item.
Duration:  Enter the duration (in days).
Task:  Select the task (if any) associated with the item.  These tasks pull from the tasks in the schedule.
Start Date:  Enter the start date of the item.
Due Date: Enter the date the item is due.
Done Date:  When the item is complete, enter the date completed.
Notes:  Enter any additional notes associated with the item.
 
Once all information is entered, click Save.
 
10

Scoring/Rating

See next section for detailed instructions.