User Guide
×
Menu

Estimates

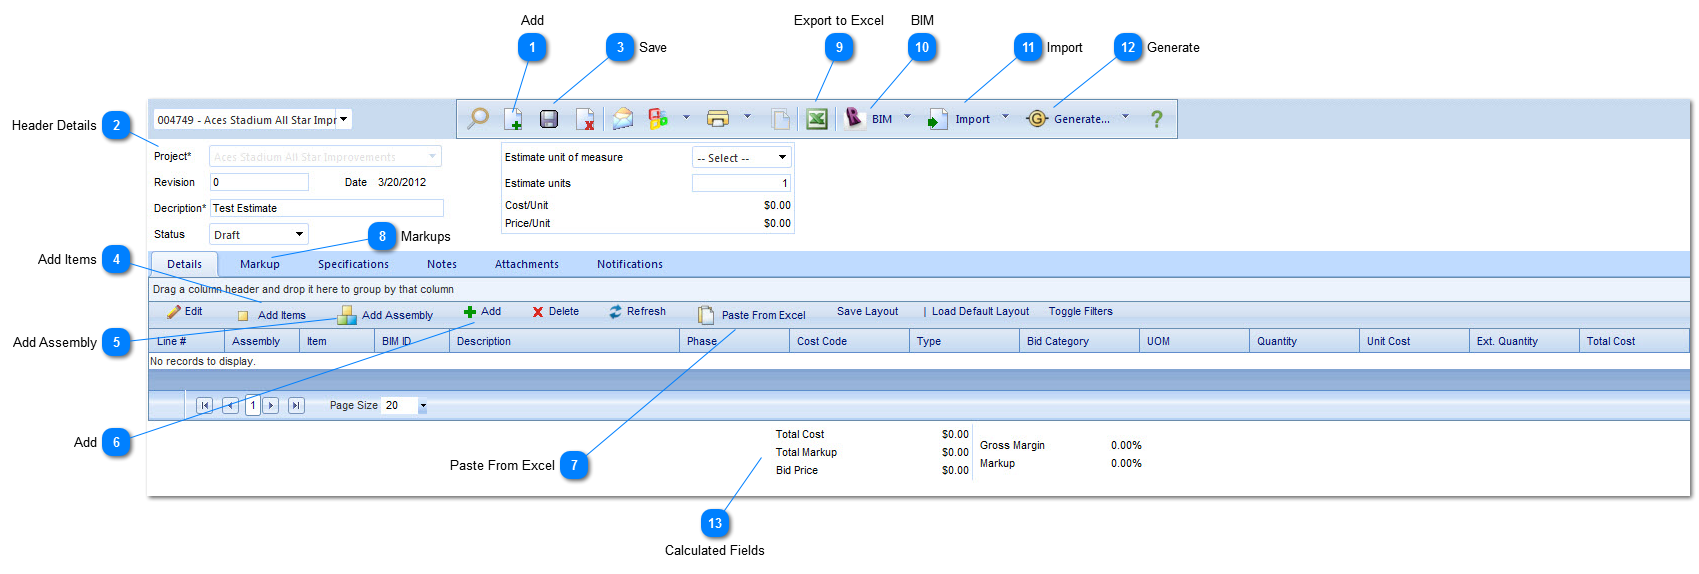
An estimate is a more high level breakdown of cost/line items.  Estimates are created and edited in the Estimates window. Each estimate is linked to a project and each project can have one or more estimates. In addition, users can generate estimate revisions with the click of a button. A revision is a complete copy of an estimate that can then be modified, leaving the original version unchanged. Multiple revisions can be generated, allowing for what-if estimating while retaining estimate development history.
 
Navigation Path: Planning > Estimates
 
Estimates
1

Add

Click to add a new estimate.
2

Header Details

Project:  Select the project for the estimate.  Once the estimate has been saved, Project can not be changed.
Revision: This field is auto populated.  You may create as many revision to the record as you wish, only the newest revision will be editable.
Description: Enter a description for the estimate.
Status:  The status (draft, submitted etc.) will automatically be updated by PMWeb based on the workflow configuration.
Estimate unit of measure: Select a unit of measure to be used to analyze the estimate.
Estimate Units: Enter the # of units to use in conjunction with Estimate unit of measure.
Cost Unit:  This is a self calculating field.  Calculation = Total Cost of the estimate divided by the Estimate Units entered.
Price Unit: This is a self calculating field.  Calculation = Bid Price of the estimate divided by the Estimate Units entered.
3

Save

Click to save the header details.
4

Add Items

Click to add items from the Items catalog that is found in the Planning>Setup>Items menu.  The items catalog will open.  Drag items and/or folders from the tree on the left hand side to the grid located on the right hand side.  Click Save and Close to add the items to the estimate.
5

Add Assembly

Click to add an assembly from the assemblies tree that is found in the Planning>Setup>Assemblies menu. Select the Assembly you wish to include, enter a Quantity for the assembly, Click on calculate to generate a total cost for the assembly.  Click Save and Close to add the calculated assembly to the estimate.
6

Add

Click to add an individual line item to an estimate.
Enter a description, Select a a Type, and Select a UOM.
Enter a quantity and a unit cost.
 
Click on the Details grid Save button to save the individual line item.
7

Paste From Excel

Paste the estimate details from an Excel spreadsheet.
8

Markups

Click on the markups tab to enter any markups for the estimate.
9

Export to Excel

Click to export the estimate to an Excel spreadsheet.  Usefull when editing large amounts of data.  The spreadsheet can be pasted back in to the estimate after editing.
10

BIM

Click to import BIM items to the estimate. Approved BIM formats are AutoCad, Navisworks, and Revit.
11

Import

Click to import a different estimate, an estimates details, or an estimate template.
12

Generate

Click to generate a budget, commitments or procurements from the estimate.
13

Calculated Fields

Total Cost:  The sum of the total cost fields for all of the estimate lines.
Total Markup:  The sum of the Markup Amount filed from the Markup tab.
Bid Price: The sum of the Total Cost + Total Markup.
Gross Margin: Total Markup divided by Total Bid Price multiplied by 100.
Markup: Total Markup divided by Total Cost multiplied by 100.