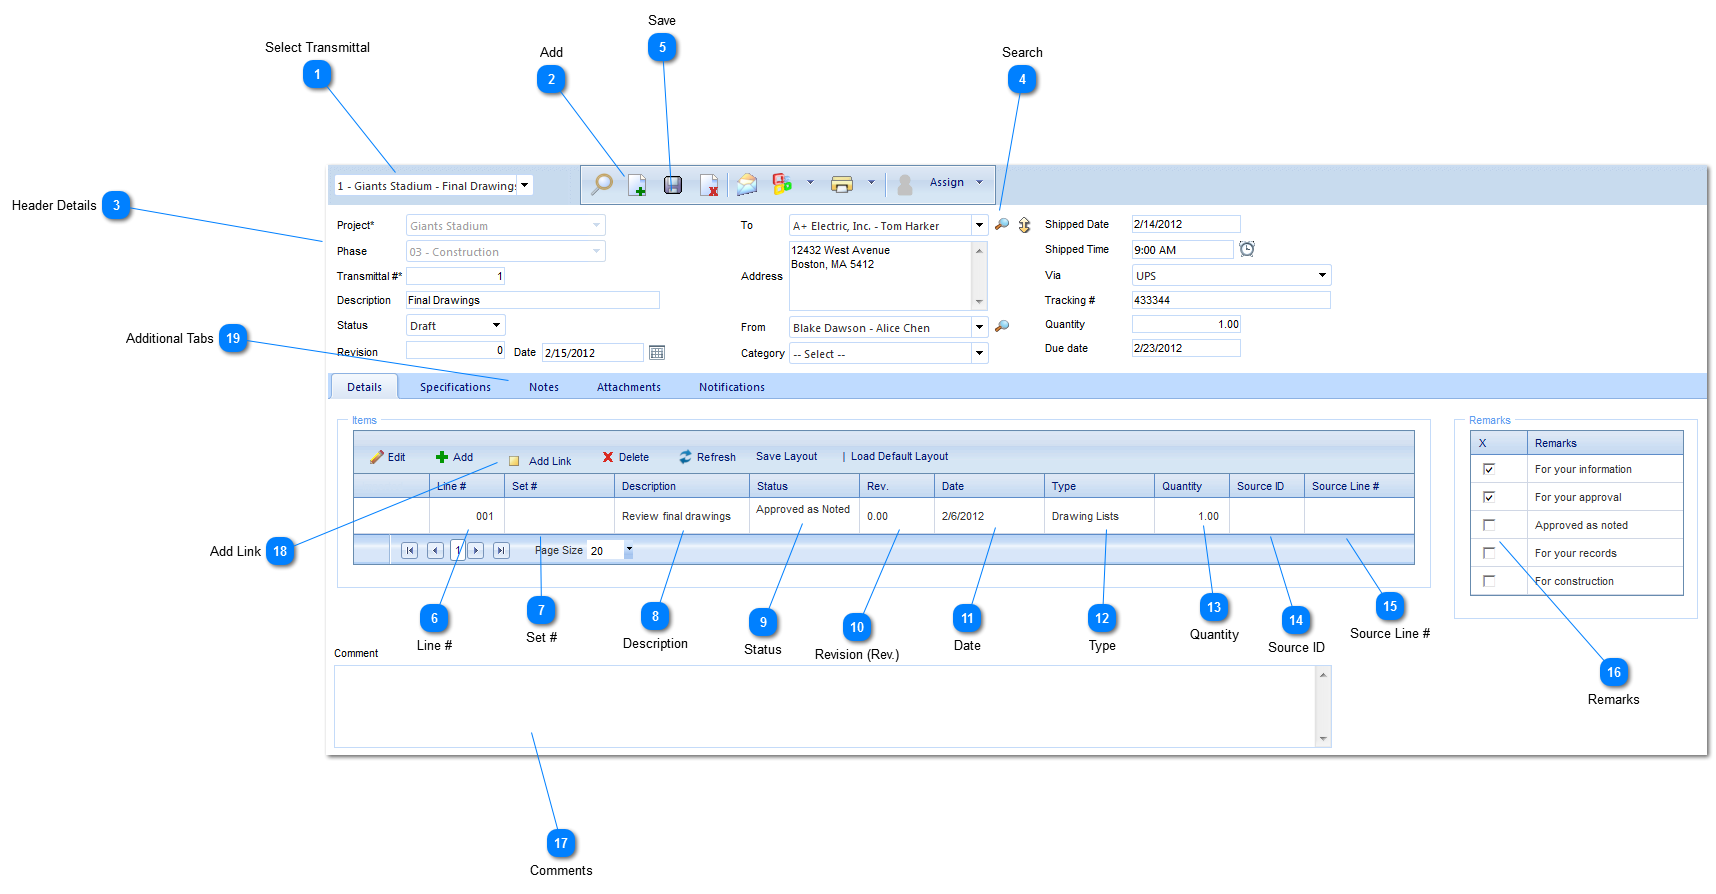
User Guide
×
Menu

Transmittals

The Transmittal form is used to identify information being sent to a receiving party.  Examples include:  drawings sets, submittals, RFI's etc.
 
Navigation Path:  Engineering Forms > Advanced Forms > Transmittal
 
Transmittals
1

Select Transmittal

Used to search for existing Transmittals.
2

Add

Click to start a new form.
3

Header Details

Project:  Used to select the project associated with the Transmittal.
Phase:  Select the phase (construction, design, etc.) that the project is currently in.  The options for this field are configured by your Administrator in the Portfolio>Lists>Projects menu.
Transmittal #:  The form number will automatically be populated by PMWeb with the next available numerical value depending on the type of form and project it relates to.  This number can also be changed to reflect you numbering system.
Description:  Enter a general description (a more detailed description should be entered in the details section of this form).
Status:  The status (draft, submitted etc.) will automatically be updated by PMWeb based on the workflow configuration.
Revision:  Enter the revision number for this record.
Date:  Enter the date of the Transmittal.
To:  Select the name of the contact who will be receiving this Transmittal.  The available contacts are set up in Portfolio>Lists>Companies.
Address:  The address will automatically be populated by PMWeb with the address associated with person in selected in the "To" field.
From:  Select the name of the contact who will be sending this Transmittal.  The available contacts are set up in Portfolio>Lists>Companies.
Category:  Select the category (mechanical, electrical etc.) associated with the CSI code.  The available options are configured by the Administrator in the Portfolio>Lists>Lists menu.
Shipped Date:  Enter the date the Transmittal was sent.
Shipped Time:  Enter the time the Transmittal was sent.
Via:  Select the shipping method (UPS, Fed Ex etc.).
Tracking #:  Enter the tracking number.
Quantity:  Enter the number of items shipped.
Due Date:  Enter the date the Transmittal is due.
 
4

Search

Use the search capability to locate a user from your contact database.
5

Save

Click the save button to save the Transmittal header data.  Once saved you will have the option of adding Transmittal line items.
6

Line #

This field will be automatically populated by PMWeb.
7

Set #

This field will be automatically populated by PMWeb.
8

Description

Enter a description for the line item.
9

Status

Select the status (approved as noted, rejected etc.) of the line item.
10

Revision (Rev.)

This field will be automatically populated by PMWeb.
11

Date

Enter the date for this item.
12

Type

Select the type (Drawing List, specs etc.) for the line item.  These types are configured by your Administrator in the Portfolio>Lists>Lists menu.
13

Quantity

Enter the number of items for that line item.
14

Source ID

This field will automatically be populated by PMWeb.
15

Source Line #

This field will automatically be populated by PMWeb...
16

Remarks

Check the appropriate box to identify the reason for the transmittal (For your information, for your records etc.).
17

Comments

Enter any additional comments regarding the Transmittal. 
18

Add Link

Use to link form to other existing forms to show background/history.
 
Add Link:  Click to link to another form.  Once clicked, a list of the existing forms will appear.  Select the one(s) you want to link and drag to the right hand side of the screen.  Once complete click Save and Close located in the bottom right hand corner of the screen.
Refresh:  Click to refresh the existing data.
Delete Link:  Click to delete an existing link.
19

Additional Tabs

For more information on the other tabs please see the Overview/Navigation section.